
Business
How To Choose The Right Decoration Method For Curved And Irregular Products

Table Of Contents
- Why Surface Shape Matters
- The Main Decoration Methods
- Where Pad Printing Fits
- When Laser Marking Makes Sense
- When Direct-To-Object Digital Printing Works
- Material, Ink, And Surface Preparation
- Production Factors To Compare
- A Step-By-Step Testing Process
- Common Mistakes To Avoid
- Frequently Asked Questions
- Final Takeaway
Printing or marking a product with curves, recesses, tapers, textures, or uneven surfaces requires more planning than decorating a flat panel. The right process depends on the part geometry, substrate, artwork, durability requirements, and production volume. For many small graphics on three-dimensional components, a pad printer can be a practical option because it transfers an image with a flexible pad rather than applying it directly with a rigid print surface.
There is no single decoration method that fits every product. A sharp logo on a curved plastic housing, a permanent serial number on metal, and a full-color design on a promotional bottle may each require different equipment, preparation steps, fixtures, and quality tests. The best decision starts by understanding the part itself before comparing machine specifications.
Why Surface Shape Matters
Surface shape affects placement, coverage, readability, and repeatability. A process that produces excellent results on a flat cover panel can struggle on a rounded button, a recessed control area, a narrow bottleneck, or a textured molded housing. Curves can stretch or visually distort artwork, while deep recesses can limit access for print heads, pads, or laser focal points.
Fixtures are equally important. They hold every component in the same position during printing or marking, reducing movement and variation from one part to the next. For example, a flat adhesive label may be simple to apply to a smooth panel, but a small safety symbol inside a recessed component needs precise positioning to remain centered and legible.
The Main Decoration Methods
- Pad printing: Best suited to small graphics on curved, recessed, or irregular areas.
- Screen printing: Often effective for larger, flatter, or gently curved surfaces with bold graphics.
- Laser marking: Useful for permanent identification, traceability codes, and serial numbers.
- Digital printing: Helpful for detailed artwork, short runs, personalization, and frequent design changes.
- Labels and decals: Practical for variable information, low setup demands, or applications where replacement matters.
- In-mold decoration: Can be appropriate when graphics need to become part of the molding process itself.
Where Pad Printing Fits
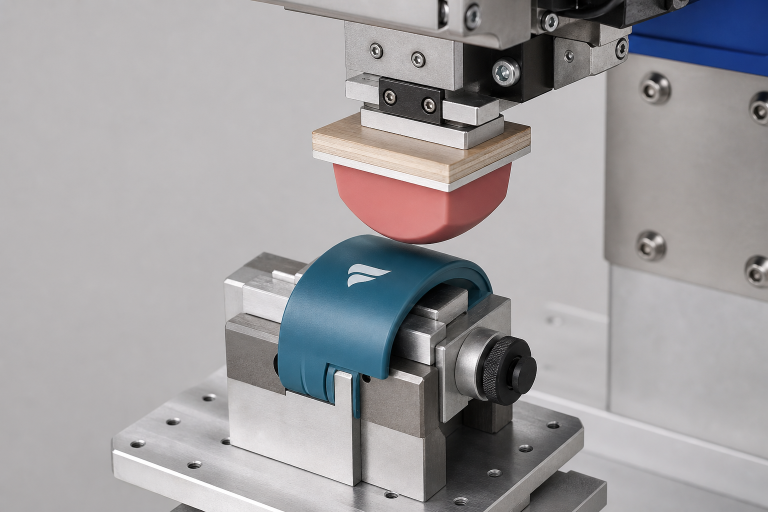
Pad printing is an indirect process in which an etched image is picked up and transferred to a product by a flexible silicone pad. The flexibility of the pad helps it conform to many three-dimensional surfaces, making it useful for small logos, legends, scales, warning symbols, control markings, and decorative accents. The basic pad printing process is widely used where a conventional flat printing approach cannot reach the intended area effectively.
Successful results still depend on careful setup. Image size, curvature, pad shape, ink selection, fixture design, pressure, and dwell time can all influence sharpness and coverage. Multi-color work also requires dependable registration so colors align consistently across the production run.
When Laser Marking Makes Sense
Laser marking is often chosen when permanence matters more than decorative color. It can be used for serial numbers, barcodes, QR codes, Data Matrix codes, safety information, and part identification. Because it does not rely on wet ink or a printing plate, it can simplify some traceability applications.
Material response is critical. Some plastics create high contrast when exposed to a laser, while others may discolor, melt, or provide insufficient contrast. Curved parts may require rotary fixtures, autofocus, or multi-axis movement to maintain a consistent focal distance. Laser marking may be less suitable when the project requires bright colored graphics or large decorative artwork.
When Direct-To-Object Digital Printing Works
Direct-to-object digital printing can be a strong choice for short runs, personalized products, detailed images, and designs that change frequently. Since artwork is digital, updates can be made without creating a new plate or stencil. This is useful for multiple product versions, regional packaging variations, or variable graphics.
However, digital systems still have physical limits. Sharp angles, deep recesses, major height changes, and rough textures can affect print quality and ink adhesion. A design that looks excellent on a gently curved item may need adjustment for an uneven molded component. Test samples should match the final part geometry rather than relying on flat reference pieces.
Material, Ink, And Surface Preparation
Part material matters as much as shape. Plastics, metals, glass, ceramics, rubber, and coated surfaces all react differently to inks, heat, and treatment methods. Oil, dust, mold release, low surface energy, and protective coatings can prevent reliable adhesion.
Depending on the substrate, cleaning, priming, flame treatment, corona treatment, or plasma treatment may be needed before decoration. One-component inks may work for simpler applications, while two-component ink systems can provide improved durability on demanding materials. Finished samples should be evaluated for rub resistance, tape adhesion, chemical exposure, heat, moisture, and UV exposure.
Production Factors To Compare
- Part geometry: Measure curves, recesses, edges, tapers, and the depth of the print area.
- Graphic requirements: Define color count, text size, line detail, contrast, and registration needs.
- Production volume: Compare setup time, cycle time, changeovers, and expected run length.
- Quality targets: Set acceptable limits for placement, color consistency, coverage, and readability.
- Durability: Consider handling, abrasion, chemicals, heat, sunlight, and cleaning procedures.
- Total cost: Include fixtures, tooling, consumables, labor, maintenance, scrap, and inspection.
A Step-By-Step Testing Process
- Map the exact decoration area on the part drawing.
- Document the substrate, finish, hardness, and any coating.
- Define the smallest text, thinnest line, and most detailed graphic feature.
- List the environmental conditions the finished mark must withstand.
- Select two or three realistic methods for comparison.
- Run samples with production-grade materials and representative fixtures.
- Inspect adhesion, placement, sharpness, color, and readability after durability testing.
- Calculate cost per acceptable part, including rejects and rework.
- Create a repeatable work instruction for the selected process.
Common Mistakes To Avoid
- Choosing equipment based only on purchase price.
- Testing flat samples instead of the final product geometry.
- Ignoring contamination from oil, dust, or mold release.
- Skipping fixture design and relying on manual placement.
- Approving artwork before completing adhesion and wear tests.
- Measuring speed without accounting for rejects, rework, and inspection time.
Frequently Asked Questions
What Is The Best Method For Printing On A Curved Product?
The best method depends on the curve, material, artwork, durability target, and run size. Pad printing is often considered for small contoured areas, while laser marking may fit permanent identification, and digital printing may fit detailed short-run graphics.
Can The Same Process Work On Plastic And Metal?
Sometimes, but surface preparation, ink chemistry, curing, and test requirements may differ. A process that adheres well to one material should not be assumed to work on another without testing.
Does A Faster Process Always Cost Less?
No. A high-speed process can cost more overall if it creates alignment problems, poor adhesion, excess scrap, or frequent rework. The most useful comparison is total cost per acceptable finished part.
Final Takeaway
Choosing a decoration method for curved and irregular products starts with the product, not the machine. Evaluate surface shape, material, artwork, durability, production volume, and quality expectations together. Controlled sampling with realistic fixtures and production-grade materials usually reveals the right path faster than catalog specifications alone, helping manufacturers achieve clearer marks, steadier output, and fewer surprises on the production floor.
Most read in News
Trending articles on News
Top articles on Minutehack


 Share article via email
How To Choose The Right Decoration Method For Curved And Irregular Products
Thanks for signing up to Minutehack alerts.
Brilliant editorials heading your way soon.
Okay, Thanks!